
Originally published: January 2017
Intro
My Pentium 4 system served me well as a primary desktop for a few years, after the incremental upgrades done to it, but as the Core architecture was leaving Netburst in the dust, games and applications were starting to take advantage of multi-core CPUs, and the computing environment in general became more complex (if not to say, bloated), it began to show its age. Having used a Thinkpad T60 with a Core 2 Duo CPU, the deficiencies of the old desktop became obvious, and I started contemplating a new primary desktop. Some time in 2008, a fortunate set of circumstances brought me a free Core 2 Extreme QX9650 quad-core CPU, which was one of the most powerful last-generation Core 2 chips. The Core i3/i5/i7 architecture was around the corner, so it may not have been the best timing for a new system, but as they say, “you don’t look a gift horse in the mouth”. Besides, this would already be a huge upgrade over the P4 desktop – think of 4 cores at the same 3GHz speed, and a far more efficient architecture.
I saw no reason to wait, and began planning a system around the QX9650. This was the first time I would be selecting each and every component, and building it from scratch, so I took quite a bit of time. Like with the P4, I was looking at the mid-to-high chipsets, not the high-extreme ones. I looked at P35 (Bearlake), but while I was picking components, the new generation of chipsets came out, so I started looking at P45 (Eaglelake) boards instead. P45/ICH10 is essentially a die-shrink of P35/ICH9 with the key feature being PCIe 2.0 support on the north bridge, giving higher theoretical maximum bandwidth for video cards. Not that I ever intended to go for a really high-end video card, but if you can have some extra potential, and a slightly lower general power consumption – why not go for it?
As my P4P800-E was still going strong at that point, I was looking towards ASUS again; their line-ups typically include a few different flavors of similar boards, so I believed I would find one with the features I want for the price I want.
Board 1: ASUS P5Q PRO
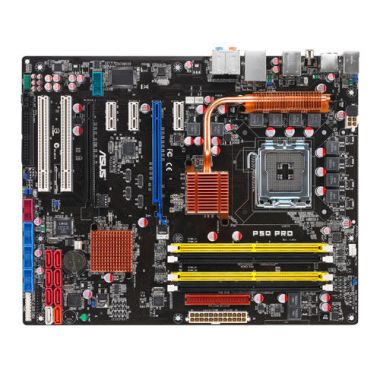
ASUS’s P45 line-up was one of their largest. So many flavors were released, that I am not even going to bother to try to list all of them. They came in several waves, though; at launch the selection was not as large, but still included entry-level, mid-range and high-end products, feature-wise. I chose the mid-range P5Q PRO, as it seemed to give me everything I was likely to need, without forcing me to pay for extras that I would probably never use (such as a third PCIe x16 slot, or multiple Gigabit Ethernet controllers). Compared to the entry-level P5Q, It did have a second PCIe 16x slot, and a third PCIe 1x slot, and still kept two PCI slots, which struck a good balance of old and new technologies.
I also liked the layout of the P5Q PRO which made most of the key components easy to access:
- The two PCI slots are at the bottom, away from the PCIe x16 slot, which is likely to host a heat-producing video card (at that time PCI was still more common than PCIe for non-graphics peripherals).
- All the front-panel headers are lined-up at the bottom edge, out of the way. As a nice touch, ASUS provides the easy-to-use Q-Connector which is used to plug all front panel system cables conveniently at the same time, and also similar connectors for USB/Firewire, in case you have a poorly designed front panel where the wires are not grouped.
- All SATA connectors are neatly placed together, far from the graphics slot, in front of the PCI slots, which typically host shorter cards. However, if you plan to use a very long PCI card, or a dual-slot secondary video card, this location will be problematic.
- The primary ATX 24-pin connector in its convenient standard location at the front middle part of the board, where the only thing it might interfere with is the legacy IDE connector.
The only absolutely weird thing with the layout that I noticed was the location of the floppy connector at the back bottom, in a way that would make it practically impossible to use with a standard front-mounted floppy. I was never thinking to use a floppy drive in that system, but it is something to keep in mind. I believe its existence on the board is more for the rare situation where you connect a drive for a one-time operation, rather than for regular use.
I remember briefly considering the P5Q-E, which was the next model upwards from the PRO, but decided against it, since I liked the layout less. The layout of the –E (and Deluxe) variants is clearly geared towards people who would be using dual long and wide PCIe graphics cards, hence the SATA ports had to be moved out of the way in a messy fashion, and the PCI slots were also shuffled around to provide maximum clearance for PCIe graphics. Finally, one of the three USB headers was moved towards the back mid board to support the optional Wireless module. Since I planned to use neither dual graphics cards, nor the proprietary WiFi, I preferred the layout of the PRO.
Incidentally, a few months after my system was built, ASUS released a slightly revised P5Q PRO Turbo variant, which I may have considered getting instead, had it been available. It added an extra heatsink on the topmost MOSFETS above the CPU socket, an eSATA port on the back panel and a firmware feature to allow quick application of overclocking profiles by using the power button as a ‘Turbo’ button (hence the name). All are nice features to have, but not mandatory, especially since you can get eSATA via a bracket (which was provided in the PRO retail package), and install a third-party MOSFET cooler, like the EnzoTech MST-81, for which the PRO already has mounting holes.
The desktop system was assembled around the P5Q PRO with the QX9650 chip in late 2008, and has served me as the primary desktop ever since, for >8 years at this point. For such a long lifetime, a lot of the components had naturally been upgraded (with some of the original ones trickling down to the old Pentium 4 desktop, where it was possible). The original and current configurations are as follows:
|
Component |
Original |
Current |
|
CPU |
Core 2 Extreme QX9650 3.0GHz (intermittently @3.6GHz) |
|
|
RAM |
4GB DDR2-1066 |
8GB DDR2-1066 |
|
Video Card |
GeForce 9600GT | GeForce GTX660 |
|
Audio |
Realtek ALC1200 (onboard) |
X-Fi XtremeGamer (PCI) |
|
Hard Drives |
Seagate 500 GB + 750 GB |
Seagate 1 TB + 2 TB |
| Optical Drives | 2x DVD-RW |
2x BD-RW |
| Case |
Gigabyte Aurora 570S Black |
|
|
Power Supply |
Enermax Modu82+ 525W |
Enermax Modu82+ 625W |
| Speakers |
Creative Inspire T2900 2.1 |
|
|
Monitor |
DELL 2007FP 20″ LCD |
DELL U2410 24″ LCD |
At its peak, the board was running with the CPU overclocked 20%, 8GB RAM with all 4 slots populated, PCIe graphics (naturally), 4 SATA drives (2 HDD + 2 optical), both PCI slots utilized (audio + 802.11g Wifi) and one PCIe 1x slot utilized (USB 3.0 controller). It’s been rock solid for a long time, but has been plagued by intermittent stability issues (random BSODs / no POST) for the past ~2 years. Several months ago they became unbearable, and I got the board thoroughly cleaned and washed in an ultrasonic bath. Not a single BSOD/POST issue since, but given my previous similar experience with such baths, but one cannot predict how long it will stay this way. In any case, I already have a backup board ready to be used when this one dies. Update September 2019: the board finally became too unstable to be used, and the backup board was installed.
Overall, I’ve been as pleased with this motherboard as I was with the one in my Pentium 4 build, and this time I got to use even more of its features; I ran with the onboard audio for a long time, and found it much better than the older generation – no static noise, and very good drivers with lots of options. Eventually I put a PCI Sound Blaster X-Fi XtremeGamer card, just for the heck of it, and did not notice any improvement in quality (if anything, the Realtek drivers did a better job on switching audio between front and rear panels automatically). I think I even used Firewire once or twice. 🙂 I did not use are the secondary SATA and IDE controllers, though, as the ICH10R provides enough SATA ports, and I no longer had need for IDE in this system.
I also did not use the “Express Gate” pre-boot environment (which honestly, I think is mostly a gimmick) and the automatic on-the-fly overclocking, although the ability to save/load two custom OC profiles in the BIOS was nice. Not being into hardcore performance chasing in games, I never had more than one video card in the system, but see no reason why it would not work, giving that how reliable the other features were. Formally, the P45 chipset does not support nVidia SLI, only ATI/AMD Crossfire, but there are tried and true ‘hacks’ to make it work.
Given the track record, I am very pleased with the P5Q PRO. For my usage patterns it was the sweet spot in the P45 line-up. For someone considering a P45 build with one of these boards I would give the following general tips:
- Basic P5Q is just as good if you don’t plan to use a lot of expansion slots; if you do, consider that it only has one PCIe x16, and two PCIe x1, one of which will be blocked by any dual-slot video card (something that is standard for anything above entry-level), and the other will be directly beneath it, taking a lot of the heat / interfering with cooling. The P5Q SE addresses that by moving the PCIe x1 slot, but removes Firewire.
- The P5Q PRO does not support triple video card configurations. You will need the -E/Deluxe/Premium versions for that.
- Nowadays that DDR3 RAM is not only faster, but also cheaper than DDR2, the P5Q3 variants are much more appealing, especially if you want to max out at 16GB (4GB DDR2 sticks are rare and expensive).
- The basic P5Q3 is actually the DDR3-equivalent of P5Q PRO in terms of capabilities and layout.
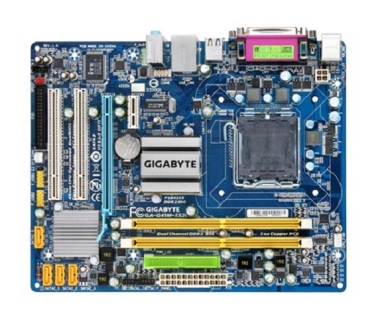
Board 2: Gigabyte G41M-ES2L
Around middle 2010 my parents asked for me to assemble a simple no-frills desktop system for basic office work, web browsing and casual movie watching. Their budget was not high, so they were looking for good quality, yet simple components. This was already well into the timeline of the first Core i3/i5/i7 generation, but those systems were still a bit pricey. While I was trying to decide between a basic i3 model versus some high-end Core model, another freebie CPU landed at my doorstep – the Core 2 Extreme QX6700, and so the dilemma was settled; even considering its age, the QX6700 was very capable, and easily overclockable, with unlocked multiplier and all.
As I did not need any fancy features or anything, I decided to go with a small G41 board, which would have the added bonus of including an integrated GPU, so a video card would not be needed. G41 boards were available with both DDR2 and DDR3 slots, but DDR3 was still more expensive than DDR2 at that point, so I chose DDR2. While it meant that I would be assembling a new system from components already being phased out, there was no question that it would be up for the task. As for future upgrade options, I did not care much about them – since I rarely upgrade core components in my PCs; I just buy new ones. 🙂
Being an ASUS fan, I wanted to go with the P5QPL-AM, but it was just pulled off the market and all the local stock was gone. The only other available G41/DDR2 board at the same price point was the Gigabyte G41M-ES2L, so this is the one I ended up with.
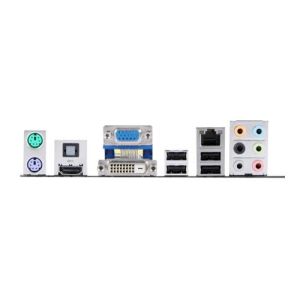
The two boards, by ASUS and Gigabyte, are similar in more than just the Micro-ATX form factor and the core components; they also share the same basic slot layout (one PCIe x1, primary PCIe x16, 2 PCI) and the same back panel layout (PS/2 Mouse+Keyboard ports, Serial, Parallel, VGA, 4 USB, LAN, Audio). Seeing serial/parallel ports on a board of this era feels anachronistic. Perhaps they wanted to cater to business clients with specific needs for legacy technologies, but most people would probably prefer another couple of USB ports, seeing that there are 4 ports available through the headers, and typical budget cases would only use two of them for the front panel.
There are, however, some differences between the P5QPL-AM and the G41M-ES2L. The LAN is Gigabit on both of them, but where the Gigabyte uses a Realtek chip, the ASUS uses the slightly more expensive Atheros L1E (that’s also present on some of its P43/P45 boards). The Gigabyte claims 8-channel audio versus 6-channel for the ASUS, but there are only 3 audio jacks on the back panel, so if for whatever reason you want 7.1 surround with this board, you need to connect the front panel header, and use the Realtek audio driver to divide the 8 channels between the front and back audio ports. Finally, ASUS did away with the floppy connector on the P5QPL-AM, while Gigabyte kept one on the G41M-ES2L, even if it’s in a weird position. Overall, a slight advantage to the Gigabyte board in expansion options.
There are some layout differences as well – most important is in the position of SATA ports. The P5QPL-AM has them all at the bottom edge, farther down than the second PCI slot, but the G41M-ES2L positions them starting from the level of the first PCI slot. This means that some of them will be difficult to access if a long dual-slot PCIe graphics card is installed. The other difference is in the auxiliary fan connectors. The Gigabyte board has one 3-pin SYS_FAN connector at the bottom; The ASUS board has two 3-pin fan connector spots – CHA_FAN between the CPU socket and the back panel, and PWR_FAN at the top front corner, for chassis fan and power fan, respectively. However, on most boards I’ve seen none of them actually had any connectors soldered; some had only the CHA_FAN, and none had both. With the placeholders there, you can always solder the connectors and the board will monitor your fan speeds. Or you can forget about it and just plug in your case fans (if any) directly to the PSU’s molex connectors.
One thing I like less in Gigabyte boards of that era is the BIOS – they use the Award which I find less intuitive than the AMI BIOS that ASUS uses. The Award BIOS has a fixed number of configuration screens, so a lot of the options end up clumped together, instead of being divided into logical groups of a few options, with sections and sub-sections. This was fine for older systems (think Pentium I/II or K5/K6 era) that had fewer options, but I do not care for it on a newer system. I was also very surprised and slightly unhappy to discover that the Gigabyte BIOS of that generation has no option to turn Numlock off at boot. I had to resort to configuring Windows to do so.
My usage experience with the G41M-ES2L has been a bit funny. The first board I got popped something and died completely on the first day. The replacement board has run with no issues for the past 6.5 years, so the first one was probably a dud and nothing more. I briefly ran the 9600GT that retired from my P5Q PRO as a video card in this system, so I could play some games, and it ran just fine. However, most of the time I have been using the onboard video, which works well as long as you don’t try to play 3D-intensive games. The downside is that it forces you to use VGA output, which is not the most crisp option for a modern LCD.
A couple of additional limitations to keep in mind – both boards only have two RAM slots, so 4GB is the most you are likely to use, unless you spend a fortune on 2x4GB DDR2 sticks (not something most people going for a budget build would do). The G41 chipset, like the G31 before it, uses the old ICH7 southbridge, which means you only get 8 USB ports (instead of 12 on ICH9/ICH10) and 4 SATA ports (instead of 6), but the actual downside is that the SATA does not support AHCI or RAID options – only the lower-performing IDE compatibility mode. However, for a budget office build, this is adequate.
Board 3: ASUS P5QPL-VM EPU

The P5QPL-VM EPU is an interesting G41 motherboard, that I was eyeing back when I was building the system for my parents, but did not go for, as it was too expensive. I recently found one used on eBay for a great price, complete with a Q9550 2.83GHz quad core CPU and 4GB of RAM installed, so I could not pass it by, if only to try it out. Plus, it is always nice to have a backup board in case one fails. I did not log many hours using the board, since I only briefly had it running in my main desktop while the P5Q PRO was misbehaving, but for what I saw it seemed quite nice.
What’s special about this board is that includes not one, but two digital video outputs – one DVI and one HDMI – a rarity for integrated video back then. They can even be used simultaneously. Basically any combination of two out of the three ports – DVI, HDMI and VGA works, provided the driver is correctly installed. During Pre-boot (POST/BIOS) stage, before the OS is loads, only one display may work. ASUS’s manual was actually confusing many people to believe that only VGA works in the BIOS, but it’s not true; as I’ve tested it with HDMI / DVI as well. As long as it’s the only display connected, you can use any of the digital ports in pre-boot environments.
I got to briefly use the board with an external PCIe GPU (GTX660), and it worked fine, although going back and forth between that and the onboard video I managed to get the board into a weird state, where it would not display any picture and not even POST until CMOS was cleared. I did not investigate this long enough to understand the pattern of failure.
The P5QPL-VM EPU has another nice addition to it over the cheaper G41 boards – it supports 7.1 audio with a full set of 6 analog jacks + optical S/PDIF out at the back panel. This comes, however, at the expense of the legacy Serial/Parallel ports; the headers are available on the board, but you need to get brackets to support these ports (they are not supplied in the package). Also, there is still no floppy support, just like on the P5QPL-AM.
Other touches that indicate this board is more “high-end” are the presence of two 3-pin fan connectors (CHA_FAN and PWR_FAN), the availability of the “EPU” function as indicated by the name. EPU stands for Energy Processing Unit and is ASUS’s trademark for their technology that attempts to optimize power usage and performance at real-time. In practice, the benefits it provides may not be very noticeable, but since it is optional, it cannot hurt to have it. Finally, the layout of the board is improved somewhat: the 4 SATA connectors are placed at the front edge, above the PCIe x16 slot, so even if you choose to use big and long PCIe graphics or PCI expansion cards, they will not be in the way.
Overall, this is one advanced board for a budget chipset, and the only downside, in my opinion, is that it still only has 2 RAM slots, not 4. There exists another G41 board in ASUS’s line-up – the non-EPU P5QPL-VM, which sacrifices the EPU feature but gives you 4 slots. It is a slightly bigger board (still within the Micro-ATX specification), and it also uses the cheaper Realtek LAN instead of Atheros, but these are reasonable trade-offs.
Update 2019: The fan in the G41 system (AC Freezer 7) gave out, which caused the CPU to overheat and shutdown frequently; it turned out simpler to swap the entire mobo+CPU+HSF for the P5QPL-VM EPU + QX9550, which the system has been running ever since; additionally, the boot hard drive was replaced with an SSD which sped the system up significantly.
Closing Thoughts
High-end Core 2 systems with quad core CPUs have aged surprisingly well. A full decade since the first processors in the line-up have been released, they can still pack a punch, and be useful for many average and above average tasks, even though a direct comparison with a modern quad-core will leave them in the dust, and in single-threaded tasks they will be beaten badly even by a modern dual-core.
If one wants to build a high-end Core 2 system, the P45/ICH10 boards are a very good choice. They provide good performance and a rich set of features, and are likely to be priced more competitively in the used market than the high-end ‘Extreme’ X48 boards.
If one is looking for a budget build, with integrated graphics, I would not recommend a G41 board these days, mostly because of the features you lose with ICH7 compared to ICH10 from the storage point of view. No AHCI support means lower performance, especially with SSDs, which require AHCI to realize their potential. There is also no hardware RAID support if you want extra speed or redundancy. Even the total number of ports may be limiting – 4 ports are far easier to exhaust than 6, especially if you still use optical drives.
The price difference between G41 and G43/G45 may have been sufficient to justify the lower-end chipset, but when shopping for a used board today, it will likely be insignificant, and G43/G45 give you much nicer options in a comparable-sized package.
